
The hardest part of first-time mounting instructions is not lifting the screen. It is trusting the wall. Will it hang true? Will it stay up? Is there stud framing behind the paint? This guide walks through the same process for a TV wall plate or a monitor arm bracket: tools, studs, wall plate, VESA rails, hang sequence, and safety checks.
Whether you are following a TV mount installation guide, searching TV montering terms from a product box, or checking tools needed to mount tv lists before a weekend project, the critical steps stay the same. Keep these mounting instructions open beside the drill so order does not drift.
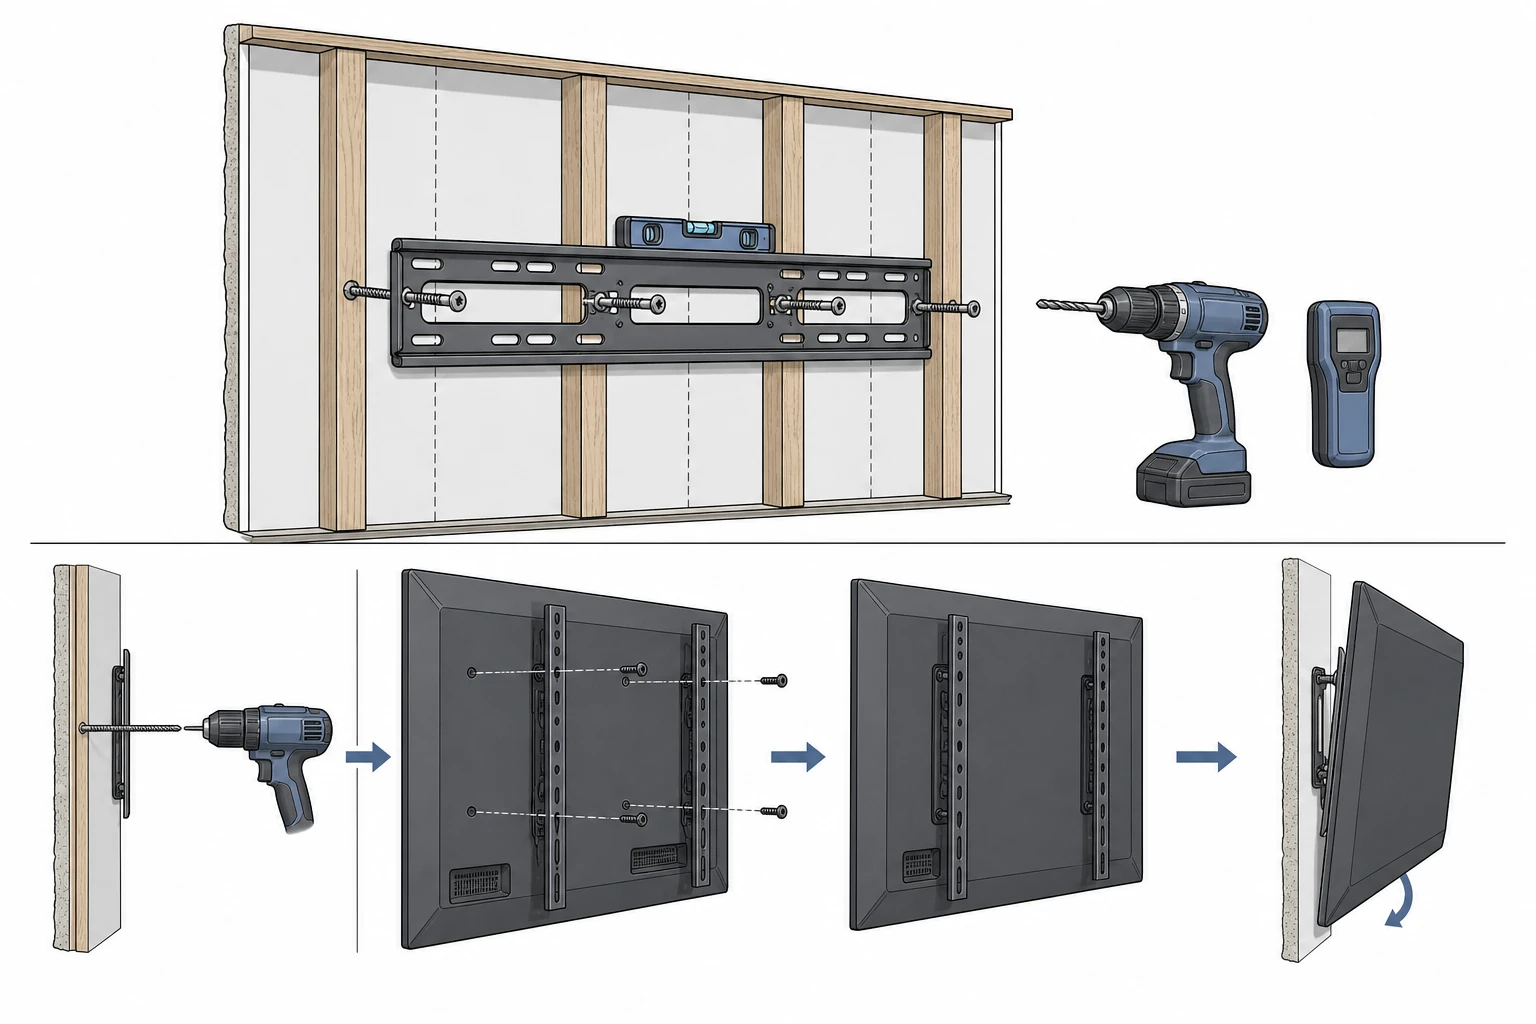
Before you start: tools and checks
Confirm the screen is mountable and the hardware matches capacity before you drill.
Confirm the screen is mountable
- Flip the panel and find four VESA holes. Common patterns: 100×100, 200×200, 300×300, 400×400 (mm).
- Match the pattern and screw length to the mount packaging.
- Check the published weight range and screen size band. A fixed plate for a 55 inch TV is not the same product as a clamp arm for a 24 inch monitor.
If the back is smooth with no VESA frets, that screen is not a wall-mount candidate without a manufacturer adapter.
Gather tools
Most installs need only household tools. People still ask what tools do I need to mount a TV because the list looks longer than it is:
| Tool | Typical count / size | Why it matters |
|---|---|---|
| Stud finder | 1 unit | Locates wood framing |
| Drill + bits | 1 drill, 3-6 mm bit | Pilot holes into studs |
| Level | 1 (or phone app) | Keeps the plate straight |
| Phillips / socket | 1 set | Tightens lag bolts and VESA screws |
| Pencil + painter’s tape | 1 roll tape | Marks without staining paint |
| Tape measure | 1 (25 ft / 7.5 m class) | Height and stud spacing |
| Helper | 2 people for 50″+ | Safer lift |
That short kit covers nearly every wood-stud residential mount installation.
Step 1: find the studs and set height
This is the step most people rush and the one that decides long-term safety.
A TV plate must land in wall studs, not floating drywall. Drywall alone does not hold a 30-50 lb panel through years of door slams and cleaning. Run the stud finder horizontally, mark left and right edges of at least two studs, and center your packing on 16 inch (or 24 inch) framing centers when the room allows.
Height rule of thumb: the vertical center of the screen near seated eye level on the main couch. Fireplace installs sit higher and usually need a tilt plate later for comfort.
Solid concrete or brick walls skip studs but need masonry anchors rated for the load. Wood lag screws into hollow block without proper anchors will fail.
Step 2: install the wall plate
- Hold the plate on the stud marks and level it.
- Mark lag bolt holes.
- Drill pilot holes into the stud centers.
- Drive the lag bolts snug, not crushed into the drywall face.
Pull on the plate after install. Any rock usually means a missed stud. Precisely carefully remount rather than painting over a mistake with toggle bolts unless the mount manufacturer explicitly rates that path.
Fixed, tilt, and full-motion plates differ in depth, but the stud rule does not change.
Step 3: attach brackets to the screen
Lay the panel face down on a clean blanket.
- Align VESA arms or rails with the hole pattern.
- Use the correct screw length so you do not bottom into the LCD stack.
- Add spacers only if the mount kit requires clearance for recessed backs.
- Hand-start every screw, then firm them evenly.
Do not overtighten soft inserts. Stripped VESA threads turn a clean job into a service call.
Step 4: hang the screen
- Lift with two people on larger sets.
- Engage the plate hooks until the hardware seats fully.
- Latch or tighten any safety screws listed in the manual.
- Level at the screen corners, not only at the wall plate.
- Connect power and video with spare service loops.
For full-motion arms, test full extension carefully once the safety locks are in. For tilt plates, set the glare angle after the safety screws are home.
Safety reminders
- Never trust drywall anchors alone for mid and large living-room TVs unless the product is purpose-built and rated for that method.
- Recheck lag bolts after the first week when wood settles.
- Keep kids and pets clear during the lift.
- Unplug the set before flipping it face down.
- If the wall remains soft after three stud-finder passes, stop and open a cavity or call a professional rather than gambling.
When hardware quality matters on install day
Cheap plates can be out of flat, forcing one lag bolt into a stress hang. ThunderTech Pros manufactures its mounting hardware in its own ISO 9001:2015 certified factories, with 17 years of production experience across TV mounts, monitor arms, and AV mounting solutions. Flatter wall plates and consistent VESA rails make the physical mounting instructions easier to follow because holes line up without forcing.
Browse fixed, tilt, and full-motion options on the ThunderTech Pros English site when you need capacity and VESA ranges clearly published before drilling.
Need a mount? match the plate to the job
| Scenario | Prefer | Typical wall depth class |
|---|---|---|
| Flush living-room wall | Fixed low-profile plate | About 0.5-1.5 in |
| Fireplace or bright windows | Tilt plate | About 1.5-3 in |
| Corner seating | Full-motion arm | 2-4 in parked / longer extended |
| Desk monitor | Clamp or grommet monitor arm | Desk-mounted, not wall depth |
Hardware choice changes clearance, not the stud rule.
How long a careful install actually takes
Plan about 45-90 minutes for a first residential fixed mount on wood studs, not counting store runs for a missing bit. Full-motion arms add time for arm travel checks. Dual monitor desk arms often finish faster (about 20-40 minutes) because there is no wall drilling when the clamp fits a finished desk edge.
A good set of mounting instructions always prioritizes stud verification first, because remounting after a missed stud can leave an extra hole pattern you have to patch and paint. Print or open the product sheet on a phone stand so both hands stay free for the lift. If the product sheet language differs from these mounting instructions, prefer the kit’s torque and lag size numbers for the hardware in your box, and use this guide for process order and safety judgment.
ThunderTech Pros technical sheets list VESA and capacity in clear bands so you can confirm before drilling. Pair that sheet with the sequence above instead of improvising mid-hang.
Frequently Asked Questions (FAQ)
What tools do I need to mount a TV?
Stud finder, drill, level, bits, screwdriver or socket, pencil, tape measure, and a second person for large panels. That list covers nearly all residential tools needed to mount TV searches.
Can I mount on drywall only?
Not for a normal-weight living-room TV. Hit studs or use a manufacturer-rated system designed for hollow walls.
How high should the TV be?
Center of screen near seated eye height for the main couch. Higher installs work better with tilt gear.
What if my studs do not line up with the plate holes?
Use a wider horizontal rail rated for offset lag points or shift the viewing position slightly. Do not stack random spacers to fake a stud hit.
Do mounting instructions differ for monitors?
The wall steps flip to desk/clamp mechanics, but VESA matching, capacity margin, and secure final latches stay mandatory. Desk arms still fail when load and clamp thickness are ignored.
Finish with a load check, not just a photo
Run your hands around the edges, confirm latches, wiggle the plate, and only then tidy cables. Follow these mounting instructions to the final load check and the screen should hang plumb, quiet, and serviceable. When friends ask for mounting instructions later, this same checklist scales from a 24 inch desk monitor arm plate to a large living-room rail. When studs, VESA, and capacity line up, install day stops being a gamble and becomes a checklist.